Proper field dressing a deer is crucial for maintaining the quality of venison. In this comprehensive guide, we will walk you through the step-by-step process of field dressing your deer. From skinning to gutting, quartering and processing. Let’s go!
Field Dressing Basics
Field dressing a deer is the critical first step in preparing your prize for processing. By following these fundamental field dressing deer basics, you can ensure the quality and safety of the venison.
Gathering the Necessary Tools
Before you begin field dressing, gathering all the essential tools is important. The right equipment will make the process easier and more efficient. Here are some tools you’ll need:
Sharp Knife: A high-quality, sharp knife is crucial for clean and precise cuts during field dressing. Choose a knife with a solid, sturdy blade to handle the task.
Gloves: Wear latex gloves for your comfort, safety, and hygiene. Choose disposable gloves explicitly made for field dressing deer, as they protect against bacteria growth and contaminants.
Other Equipment: Depending on your preferences and needs, you may also want to consider having additional equipment such as a bone saw, game bags for meat storage, and a gambrel or hoist for suspending the deer.
Ensuring Safety and Hygiene
Safety should always be a top priority when field-dressing a deer. Follow these guidelines to ensure a safe and hygienic process:
Choose a Safe Location: Find a flat and stable area to perform the field dressing. Ideally, it should be away from public areas and sources of water to prevent contamination.
Wear Protective Clothing: In addition to gloves, wear appropriate clothing that protects against dirt, blood, and potential hazards. This may include a waterproof apron or bib and sturdy boots. The last thing you want is bacteria growth.
Keep First Aid Kit Handy: Accidents can happen, so having a well-stocked kit is essential. Include items such as bandages, antiseptic wipes, and tweezers to remove any splinters or foreign objects.
Handle Tools with Care: Always carefully handle your knife blade and other tools. Keep the knife blade sharp and use it responsibly to avoid accidental cuts.
Dispose of Waste Properly: As you progress through the field dressing process, dispose of waste responsibly. This includes entrails, organs, and other debris. Be mindful of local regulations and dispose of waste in designated areas or according to specific guidelines.
Clean and Sanitize: After completing field dressing, thoroughly clean and sanitize your equipment, including your knife and gloves, using cold water. This helps prevent the spread of bacteria and ensures your tools are ready for future use.
Adhering to this field dress-a-deer basics lays the foundation for a safe, efficient, and hygienic process. With the necessary tools and a focus on safety, you’ll be well-prepared to move on to the next steps of skinning, gutting, and quartering your deer.
Skinning the Deer
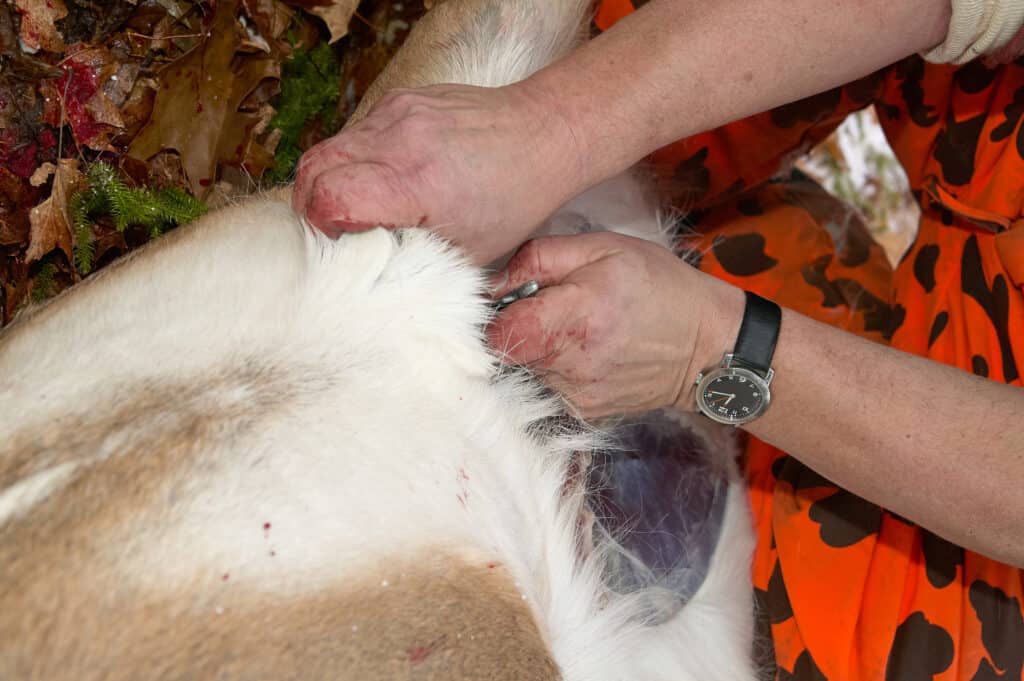
Skinning the deer is an essential step in field dressing that allows you to remove the hide, open the body cavity, and access the meat. Follow these guidelines to ensure a successful and efficient skinning process.
Preparing the Deer for Skinning
Before you begin skinning, it’s essential to position the deer properly for easier access and maneuverability. Follow these steps:
Secure the Deer: Lay the deer’s body cavity on its back with the hind legs spread apart and secure it in place. This can be done using ropes or propping the legs against trees or other sturdy objects.
Removing the Head and Legs (Optional): To make the skinning process more manageable, remove the head and legs from the body cavity. Using a knife blade, make a clean cut between the skull and the first vertebra to remove the head. Use a bone saw or a sharp knife to sever the joints of the legs.
Removing the Sex Organs: If the deer is a buck, and the state does not require that organs remain naturally attached as evidence of sex, remove the organs with a sharp knife. Starting between the hind legs and cutting down to the pelvic bone. It’s best to slit the skin and peel it back before cutting through the muscle layer.
Skin Removal Techniques
Once the deer is properly positioned, you can begin the process of skinning. Follow these step-by-step techniques:
Make an Incision: Begin by making a shallow incision along the inside of the deer’s hind legs, from the lower legs to the chest cavity. Be careful not to puncture the internal organs.
Peeling the Skin: Grasp the skin firmly with one hand and carefully use your knife to separate the skin from the underlying muscle. Work your way up the legs using short and controlled strokes.
Cutting Techniques: As you continue to peel the skin, use your knife to make small incisions when necessary. This can help separate the hide from the muscle, particularly around joints and areas with more rigid connective tissue.
Removing the Hide: Gradually work towards the front of the deer, pulling the skin down as you go. Use your free hand to help guide the hide and ensure a smooth and even removal. Take caution around delicate areas such as the neck and brisket.
Handling the Hide: After completely removing the hide, carefully fold it and set it aside for further processing or disposal. Properly handling the hide will prevent contamination and ensure its preservation if used for taxidermy or tanning purposes.
During the skinning process, cleanliness and hygiene are essential. Avoid touching the meat with the hide and introducing dirt or debris. If the deer was harvested in warm weather, keep the meat cool by spraying it with cold water or placing it in the shade.
By following these skinning techniques and maintaining cleanliness throughout the process, you’ll efficiently remove the hide and gain access to the chest cavity for further field dressing and processing.
Here are some additional resources for helping you through the skinning process:
Gutting the Deer
Gutting the deer is a crucial step in field dressing that involves removing the internal organs to ensure the quality and safety of the meat. Follow these steps to perform the gutting process effectively.
Opening the Abdomen
Prepare for Gutting: Once the deer is properly skinned, position it on its back with the legs spread apart. Locate the sternum (breastbone) and make a shallow vertical incision from the sternum down to the pelvis. Take care not to puncture the organs beneath.
Expose the Internal Organs: With the cavity open, use your hands or a tool to carefully separate the skin and muscle layers. Slowly work your way down, exposing the internal organs, including the diaphragm, the stomach and intestines.
Removing the Internal Organs
Remove the Digestive Tract: Starting from the base of the diaphragm, use your knife to carefully sever the esophagus and windpipe. Proceed by making a circular cut around the anus. Take caution to avoid puncturing the intestines or bladder.
Remove the Intestines: Use your hands to gently lift the intestines and locate the attachment point where they connect to the back of the deer. Cut through this attachment point, separating the intestines from the body.
Remove the Stomach and Bladder: To remove the stomach, carefully cut around its connection to the esophagus and gently pull it out. Similarly, locate the bladder and sever the connections, being cautious to avoid any spillage.
Handle the Organs Carefully: As you remove the internal organs, handle them with care to prevent punctures or contamination. Place them in a clean area or a separate container if you plan to keep any organs for processing or inspection.
Throughout the gutting process, it’s essential to maintain cleanliness and hygiene. Avoid allowing the organs to come into contact with the meat and take care not to puncture or damage any part of the digestive tract. If needed, you can rinse the cavity with clean water to remove any blood or debris.
Properly gutting the deer ensures the removal of the organs that can contribute to spoilage and taint the meat’s flavor. By following these steps and handling the internal organs with care, you’ll maintain the quality and safety of the venison for further processing.
Quartering the Deer
Quartering the deer involves breaking the carcass into manageable sections, making transportation and further processing easier. Follow these steps to quarter the deer effectively.
Preliminary Quartering Steps
Position the Deer: With the gutting process complete, position the deer on its back with the legs spread apart. Ensure stability and secure the deer if necessary.
Removing the Legs and Shoulders: Begin by removing the legs and shoulders. Use a sharp knife or a bone saw to cut through the joints that connect the legs and shoulders to the body. Apply controlled pressure to separate these sections.
Breaking Down the Carcass
Separating the Hindquarters: Locate the natural separation between the hind and body. Carefully cut through the connecting tissues and separate the hindquarters from the carcass using your knife or saw. Repeat the process on the other side.
Removing the Backstraps: Backstraps, also known as tenderloins, are highly desirable cuts. To access them, incision along either side of the backbone and carefully remove the long, cylindrical muscles. Take care to avoid cutting into other muscle groups.
Deboning and Trimming: Once the quarters and backstraps are separated, you can debone and trim the meat to your desired specifications. Remove excess fat, silver skin, and any undesirable tissues. Cut the meat into manageable portions or further process it into specific cuts like steaks or roasts.
As you quarter the deer, handling the meat carefully and maintaining cleanliness is crucial. Avoid cross-contamination by using clean-cutting surfaces and keeping the meat away from contact with the ground or other potential sources of contamination.
Properly quartering the deer allows for more accessible transportation and provides flexibility in further processing options. By following these steps and taking care during the deboning and trimming process, you can maximize the usability and quality of the venison.
Processing Venison
Processing venison is the next step after field dressing and quartering the deer. It involves various techniques to preserve and prepare the meat for consumption. Explore the following aspects of processing venison.
Chilling the Meat
Importance of Prompt Cooling: After field dressing and quartering, it’s crucial to cool the meat right away to maintain quality. Cooling inhibits bacterial growth and helps preserve the flavor and texture of the venison.
Hanging the Carcass: One option for chilling the meat is to hang the carcass in a cool, well-ventilated area. Suspend it securely, allowing air to circulate the meat. Check local regulations and guidelines regarding hanging game.
Refrigeration: If you have access to refrigeration facilities, you can choose to refrigerate the quarters or specific cuts of venison. Keep the meat at a temperature below 40°F (4°C) to slow down spoilage.
Processing Options
Butchering at Home
- Step-by-Step Guide: If you prefer to process the venison yourself, follow a step-by-step guide for butchering. Start by breaking down the quarters into individual cuts like steaks, roasts, or stew meat.
- Cutting and Packaging Techniques: Use a sharp knife and proper cutting techniques to achieve desired cuts. Vacuum-seal or wrap the meat tightly in plastic wrap, butcher paper, or freezer paper to prevent freezer burn and maintain freshness.
Professional Processing
- Benefits of a Professional Processor: Utilizing the services of a professional meat processor offers several advantages. They have specialized equipment, knowledge, and expertise to process the venison efficiently. It can save you time and effort while ensuring professional-quality results.
- Finding a Reputable Processor: Research local meat processors and choose one with a good reputation for handling game meat. Seek recommendations from fellow hunters or check online reviews. Discuss your preferences with the processor beforehand, such as cut thickness and packaging options.
When processing venison, cleanliness, and hygiene are essential. Keep the work area and equipment clean to prevent cross-contamination and ensure food safety. Label and store processed venison in the refrigerator or freezer at appropriate temperatures.
Sausage Making and Specialty Products
For those looking to explore unique flavors and preparations, making sausages from your venison can be a rewarding and delicious option. Follow these steps to embark on the journey of creating your venison sausages:
- Equipment and Ingredients: Gather the necessary equipment, including a meat grinder, sausage stuffer, casings (natural or synthetic), spices, seasonings, and any additional ingredients you want to incorporate into your sausages.
- Prepare the Meat: Ensure your venison is well-chilled or partially frozen for easier grinding. Trim away any excess fat or connective tissue and cut the meat into small chunks that can fit through the grinder.
- Grinding: Set up your meat grinder with the appropriate grinding plate. Feed the chunks of venison through the grinder, collecting the ground meat in a clean bowl or container. You can mix different cuts of venison or combine it with other meats like pork or beef for added flavor and moisture.
- Seasoning and Mixing: Add your desired spices, seasonings, and other ingredients to the ground meat. This is where you can get creative and experiment with various flavor profiles. Mix the ingredients thoroughly to ensure even distribution.
- Stuffing the Sausages: Attach the sausage stuffer to your grinder and feed the seasoned meat mixture into the stuffer. Prepare the casings by rinsing and soaking them in water. Slide the casings onto the stuffer tube, leaving a slight overhang. Stuff the meat mixture into the casings, ensuring an even fill without overstuffing.
- Linking and Forming: Once the sausages are stuffed, you can twist and link them by pinching the casing and twisting it regularly. Alternatively, leave them as unlinked sausages if you prefer. Prick any air bubbles with a sterilized pin to prevent bursting during cooking.
- Rest and Cure: Allow the sausages to rest in the refrigerator for a few hours or overnight. This allows the flavors to meld and the sausages to develop a firmer texture. It’s also an ideal time to sample a small portion to ensure the seasonings are to your liking.
- Cooking and Storage: Cook the sausages according to your preferred method, such as grilling, pan-frying, or baking. Ensure they are cooked to a safe internal temperature. Any leftover sausages can be stored in the refrigerator for a few days or frozen for longer-term storage.
Experiment with different spice blends, herbs, and other ingredients to create unique flavors and variations. Keep track of your recipes and adjustments to replicate successful results in the future.
By venturing into sausage making, you can add a personal touch to your venison and create delicious sausages tailored to your tastes. Enjoy savoring your homemade creations or sharing them with friends and family.
Cleaning Up and Disposing of Waste
Properly cleaning up and disposing of waste generated during the field dressing process is essential for environmental considerations and adhering to local regulations. Follow these guidelines to manage the carcass responsibly, remains, and waste products.
Carcass Disposal:
Determine the appropriate method of disposing of the deer carcass based on local regulations and environmental considerations. Common disposal options include:
- Burial: Dig a deep hole away from water sources and bury the carcass. This method helps prevent scavengers from accessing the remains.
- Composting: If permitted in your area, you can compost the carcass in a designated compost pile or bin. Ensure the composting area is secure and inaccessible to animals.
- Rendering Facility: Some regions have rendering facilities that accept animal remains for processing. Check if any nearby facilities can handle the disposal of the deer carcass.
Waste Management:
Properly manage the waste generated during the field dressing process, such as organs, trimmings, and other non-edible parts. Consider the following:
- Offal Disposal: Bury or compost the organs and offal separately from the carcass. Alternatively, some areas may have specific regulations for disposing of animal waste. Contact local authorities to understand the appropriate disposal methods.
- Trim and Fat Disposal: Excess fat and trimmings can be disposed of in several ways. If allowed, they can be added to a compost pile or bin. Another option is to package them securely in a bag and place them in a sealed garbage container for collection.
Environmental Considerations:
When choosing disposal methods, take into account environmental factors and local guidelines:
- Protect Water Sources: Ensure that carcass remains, refuse, and other waste products are disposed of in a way that prevents contamination of nearby water sources, including rivers, streams, or wells.
- Wildlife Interactions: Minimize the chances of attracting wildlife to your disposal area by burying the carcass deep enough or using secure composting methods. This helps prevent unwanted interactions and potential conflicts with wildlife.
Always comply with local regulations and guidelines regarding waste disposal and carcass management. Contact local authorities or wildlife management agencies for further guidance if you are unsure about the appropriate methods or have specific concerns.
By responsibly cleaning up and disposing of waste generated during the field dressing process, you contribute to environmental preservation and ensure compliance with regulations. These steps will help maintain a clean and sustainable hunting environment for future generations.
FAQs
How to skin a deer?
Skinning a deer is a common practice after a successful hunt. Properly skinning the deer is essential to ensure the meat’s quality and make processing more efficient. Here’s a step-by-step guide on how to skin a deer:
Note: Skinning a deer requires some tools and basic knowledge of anatomy. If you’re new to this process, consider seeking guidance from experienced hunters or watching instructional videos before attempting it yourself.
Tools Needed:
- Sharp hunting knife
- Game bags or plastic bags (for meat storage)
- Rope or hoist (for hanging the deer)
- Cutting board or clean surface
Instructions:
Hang the Deer
- Find a suitable location to hang the deer, such as a tree limb or a deer-hoisting setup. Hanging the deer makes the skinning process easier by providing better access to the body.
Make Initial Cuts
- Begin by making a small incision around the base of the deer’s neck, just below the head.
- Extend the incision down the belly to the anal area. Be careful not to puncture the intestines or stomach.
Peel the Skin
- Using your fingers and the sharp knife, gently separate the skin from the underlying meat.
- Work around the deer’s body, gradually peeling the skin away. Use the knife to cut through connective tissues as needed.
Remove Limbs
- Cut through the joints to remove the limbs once the skin is peeled down to the legs. This can be done at the knees and ankles.
Expose the Hams
- Continue to peel the skin down to the hindquarters (hams).
- Cut around the anus, making sure to avoid cutting into the intestines.
Detach the Skin
- As you peel the skin down, use your knife to cut through any remaining connective tissues and membranes holding the skin to the meat.
Free the Head
- Work the skin down to the head. Cut through the neck muscles and tendons to free the head from the skin.
Finish Peeling
- Once the skin is completely detached, you should have the deer’s body with the skin hanging off it.
Remove Excess Fat and Tissues
- Trim away excess fat, connective tissues, and membranes from the meat.
Process the Meat
- With the skin removed, you can now quarter the deer and further process the meat for consumption or storage.
Remember to carefully handle the deer and keep the meat clean throughout skinning. Properly cooling and processing the meat is crucial to maintain its quality and safety. Additionally, local regulations may vary, so follow any legal requirements for processing game in your area. If you’re new to skinning, consider seeking assistance from experienced hunters or attending workshops to learn the proper techniques.
How to tan a deer hide?
Tanning a deer hide is a process that transforms the raw hide into a preserved, durable material that can be used for various purposes, such as clothing, accessories, or decorative items. There are different tanning methods, including traditional and modern chemical methods. Here’s a basic guide to tanning a deer hide using the brain-tanning method, which is a traditional approach:
Note: Tanning requires patience, practice, and experience working with hides. If you’re new to tanning, consider seeking guidance from experienced tanners or referring to detailed instructional resources.
Materials Needed:
- Fresh deer hide (hair-on)
- Brain paste (made from deer brains or a commercial brain-tanning solution)
- Salt
- Water
- The frame or stretching rack
- Fleshing knife or scraper
- Work area with proper ventilation
Instructions:
Prepare the Hide:
- I remove any remaining flesh, fat, or membrane from the hide using a fleshing knife or scraper. Work carefully to avoid cutting or damaging the hide.
Salt the Hide:
- Lay the hide flat and sprinkle salt on the flesh side. Fold the hide over itself, flesh side in, and roll it up. Let it sit for several hours or overnight to draw out moisture.
Remove Salt and Rinse:
- Unroll the hide and shake off excess salt. Rinse the hide under running water to remove the salt. Gently wring out excess water.
Prepare the Brain Paste:
- If using natural brain paste, extract brains from the deer’s head. Mix the brain matter with warm water to create a paste. If using a commercial brain-tanning solution, follow the manufacturer’s instructions.
Apply Brain Paste:
- Spread the brain paste evenly on the flesh side of the hide. Massage it into the hide to ensure thorough coverage.
Fold and Rest:
- Fold the treated hide over itself, flesh side in. Allow the paste to penetrate the hide by resting for several hours.
Stretch and Work the Hide:
- Attach the hide to a frame or stretching rack to keep it taut. Use your hands, a round stick, or a rounded tool to work the hide, stretching and softening it.
Air Dry and Smoke:
- Hang the hide in a well-ventilated area to air dry. Once dry, you can smoke the hide over a smoldering fire. The smoke helps to preserve the hide further and gives it a pleasant scent.
Work the Hide Again:
- After smoking, work the hide again, stretching and softening it until it becomes supple.
Finish and Use:
- Once the hide is soft and supple, you can use it for various purposes. Remember that the finished hide will be hair-on and may require additional steps to remove the hair.
Remember that tanning is a skill that requires practice to achieve optimal results. Brain tanning is just one method; other methods use chemicals and commercial products. If you’re new to tanning, consider seeking guidance from experienced tanners or attending workshops to learn the process thoroughly.
Conclusion
By mastering the art of field dressing and processing your deer, you can enhance the quality of your venison and fully enjoy the rewards of your hunting experience. This comprehensive guide has equipped you with the knowledge and step-by-step instructions for field dressing, skinning, gutting, quartering, and processing venison.
Remember to prioritize safety, hygiene, and proper handling throughout the process. Practice and refine your skills, and you’ll be well on your way to becoming an expert in field dressing and processing your deer.


